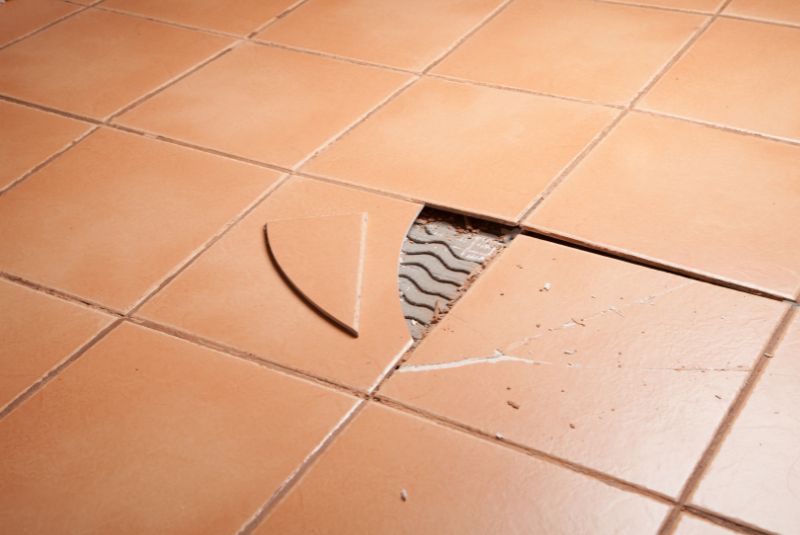
Tile floors are renowned for their durability, but even they can’t escape the occasional crack.
Whether it’s a result of poor installation or the aftermath of a dinner plate’s untimely demise, a cracked tile doesn’t have to mean a full-blown replacement project.
Instead of worrying about the costly and labor-intensive process of replacing all tiles, pursue our idea of seamless cracked tile repair without having to remove it.
Before You Begin: Assessing the Damage
Before diving into the repair process, we recommend that you quickly assess that the extent and cause of tile damage are important factors.
A hairline crack due to an accidental drop could often be repaired successfully.
However, if the tile had popped or shattered under minimal pressure, it was likely a result of improper installation, and attempting to repair it would be futile.
For chipped, shattered or heavily broken tiles, in addition to a thin crack, we know that these are cases where removing and replacing new tiles is unavoidable.
Related: STEP-BY-STEP GUIDE: USING A FLOAT FOR GROUTING LIKE A PRO
Safety First: Preparing for the Repair
Before venturing into the repair, I equipped myself with the right safety gear.
Epoxy, a key component in this process, can be harsh on the skin before it cures.
So, I donned gloves, a mask designed for fumes, and protective eyewear.
To ensure adequate ventilation, I opened windows during the epoxy application.
Additionally, to prevent children or pets from interfering with the curing epoxy, I wisely blocked off the repair area.
Materials at the Ready
With safety in mind, I gathered the necessary tools and materials for this project:
- Gloves
- Fumes-rated mask
- Eye protection
- Small paintbrush
- Dish soap
- Rubbing alcohol
- Rag
- Two-part clear epoxy
- Popsicle sticks
- Toothpicks (optional)
- Oil- or urethane-based paint
- Clear urethane sealer
- Cardboard
Related: HOW TO PAIN TILE
Step 1: Clean the Damaged Tile
The repair process began with meticulous cleaning.
After vacuuming the tile and its surroundings, I scrubbed the tile with a mixture of dish soap and water, concentrating on the crack.
My goal was to remove any dirt, grime, or debris from the crack’s surface.
Once the area was dry, I repeated the cleaning process using rubbing alcohol to ensure that all grease and grime were eliminated.
Caution: I made sure not to use excess water around the cracked tile, as excessive moisture could penetrate the tile, causing issues once the repair was complete.
Step 2: Mix the Two-Part Epoxy
Following the manufacturer’s instructions, I mixed the two-part epoxy thoroughly.
Many epoxy options involve squeezing the two parts out of a double-sided syringe or two individual tubes onto a cardboard surface.
Then, I used a small disposable item, like a popsicle stick, to ensure thorough mixing.
Step 3: Apply the Epoxy to the Crack
Using a popsicle stick to spread the epoxy, I meticulously filled the crack.
In cases where the crack was exceptionally thin, a toothpick proved to be more effective.
My goal was to ensure that the crack was entirely filled, with approximately 1/8 inch of coverage on each side.
I took care to make the epoxy level with the tile surface.
It’s important to note that the working time of the epoxy may vary depending on the type chosen.
Hence, I allowed the epoxy to cure for the time specified in the manufacturer’s instructions.
Step 4: Check the Epoxy
Once the epoxy had cured, I tapped it gently with a popsicle stick to ensure it had fully hardened.
It was a satisfying moment, knowing that the repair was progressing as planned.
Step 5: Paint the Crack
To achieve a seamless finish, I used a small paintbrush to match the paint with the tile.
Since my tile featured variations in color, I opted to use multiple paint colors to mimic the look accurately.
Tip: While painting and sealing contribute to the overall project cost, I understood their importance. However, if you’re looking to save on expenses, especially for less noticeable areas, you can consider skipping this step.
Step 6: Seal the Repair
Once the paint had dried, I applied a clear urethane sealer to protect and ensure the longevity of the repair.
This step was essential for preserving the quality of the repair for years to come.
Related: A CLOSER LOOK AT TERRACOTTA TILES: TYPES AND APPLICATIONS
Removing and Replacing Broken Tiles: The Alternative
In case the repair didn’t hold up or if I concluded that a tile needed replacement, I knew the process involved sourcing a matching replacement tile.
It would require cutting away the grout and carefully removing the broken tile.
Subsequently, I’d have to eliminate all tile mortar from the subfloor and replace it before installing the new tile.
Tip: Keeping spare tiles in storage after a new installation is wise, as it simplifies future repairs.
For those who might be uncertain about their tile replacement abilities or concerned about the root cause of the damage, consulting a professional is always a prudent choice.
Related: HOW TO DRILL INTO TILE
FAQ
Will a cracked tile inevitably worsen?
In many scenarios, the fate of a cracked tile tends to hang in the balance.
The trajectory of deterioration is closely tied to both the extent of the fracture and its root cause.
A delicate hairline crack stemming from a minor mishap may indefinitely hold its ground, while a fissure resulting from an uneven floor is more inclined to amplify over time.
Is it possible to grout a fractured tile?
Indeed, the notion of grouting a fractured tile is not beyond the realm of possibility.
Nevertheless, one must tread carefully, for the tenacity of the grout hinges on the tile’s willingness to cooperate.
Whether the tile succumbs to further breakage is contingent on the gravity of the existing damage and the initial cause thereof.
Can a cracked tile be the source of a leak?
Without a doubt, a cracked tile possesses the innate potential to instigate a leak by permitting the infiltration of water through its surface, ultimately reaching the subfloor.
Subsequently, this trapped moisture has the capacity to unleash havoc, potentially culminating in substantial damage if not addressed in a timely manner.