Project Overview
- Working Time: 20 – 30 minutes
- Yield: Covers an area of 650 to 700 square feet with grouted tile
- Skill Level: Suitable for Beginners
- Estimated Cost: Approximately $30 to $40
Grouting serves as the pivotal final step in tile installation, offering essential functions in filling tile seams and enhancing the bond between tiles.
The process of mixing dry, powdered grout is a straightforward endeavor that only requires a few tools: an electric drill equipped with a handle, a grout mixing paddle, a margin trowel, a 5-gallon plastic bucket, nitrile gloves, a dust mask, and a measuring cup.
Coupled with fresh water, these essential tools empower you to master the art of grout mixing, resulting in a seamless blend that proves both cost-effective and superior to premixed tile grout.
Preparation Before Commencement
Before venturing into the realm of tile grout mixing, several crucial considerations must be addressed.
Your choices regarding sanded or unsanded grout and the selection of an appropriate grout color are paramount.
Sanded vs. Unsanded Grout
- Opt for sanded grout when working with grout lines spanning from 1/8-inch to 1/2-inch in width.
- Reserve unsanded grout for narrower grout lines measuring less than 1/8-inch. Additionally, consider unsanded grout for use with honed stone, specific ceramics, glass, metal, marble, or delicate tiles that could sustain damage when subjected to the rubber tile float during the grouting process.
Grout Color Palette
Dry grout mix boasts an extensive palette of 40 to 50 meticulously blended colors.
This spectrum commences with the pure simplicity of white and advances through an array of grays, blues, browns, culminating in deep black.
The choice of grout color exerts a profound influence on the final aesthetic:
- Opt for a grout color that closely mirrors the shade of the tile for a seamless, understated appearance.
- Alternatively, select a contrasting grout color to achieve striking, defined grout lines that make a bold design statement.
Helpful Tip: Premixed grout, once stirred, is instantly ready for application. This option proves highly convenient for tile projects with limited color requirements. In scenarios where cost is not a concern, premixed grout presents a viable alternative to the preparation of dry, powdered grout.
Timing Is Essential for Grout Mixing
The ideal time frame for grout mixing falls within the window of 10 to 20 minutes before commencing the grouting process.
It is imperative not to rush into grouting immediately after mixing, as the grout necessitates approximately 10 minutes for the slaking process to occur.
Subsequently, around 30 to 60 minutes after the initial mix, the tile grout will embark on the path to hardening and setting.
Deciphering Tile Slaking
Tile slaking entails the practice of allowing the mixed tile grout to remain undisturbed for a brief duration.
This period of slaking facilitates the coalescence of the chemical components within the grout, ultimately contributing to the development of a more robust grout that significantly bolsters the strength of the tile bond.
Prioritizing Safety
- When engaging in grout mixing, safeguard your well-being by wearing a dust mask, effectively shielding against the inhalation of grout particles.
- Additionally, exercise caution by donning nitrile or other chemical-resistant gloves when handling tile grout.
Essential Equipment and Materials
Tools / Equipment
- Electric drill with handle
- Grout mixing paddle
- Margin trowel
- 5-gallon plastic bucket
- Nitrile gloves
- Dust mask
- Measuring cup
Materials
- 1 bag of grout (25 lb.)
- Freshwater
Professional Grout Mixing Instructions for Impeccable Results
Step-by-Step Guide on How to Mix Tile Grout
Step 1: Prepare the Mixing Area and Tools
To ensure a smooth grout-mixing process, it’s crucial to have all your tools and equipment readily accessible.
Begin by attaching the mixing paddle to your electric drill.
Position the 5-gallon bucket within arm’s reach.
If you’re mixing grout indoors, consider working atop plastic sheeting.
Additionally, allow the tilework to set fully for a minimum of 24 hours before commencing the grouting process.
Step 2: Add the Grout to the Bucket
Carefully pour the contents of the grout bag into the 5-gallon bucket.
Exercise caution to pour slowly, minimizing the generation of dust particles.
Step 3: Add Water to the Grout
Gradually introduce 1 quart (equivalent to 8 cups) of clean, room temperature tap water to every 25 pounds of dry grout.
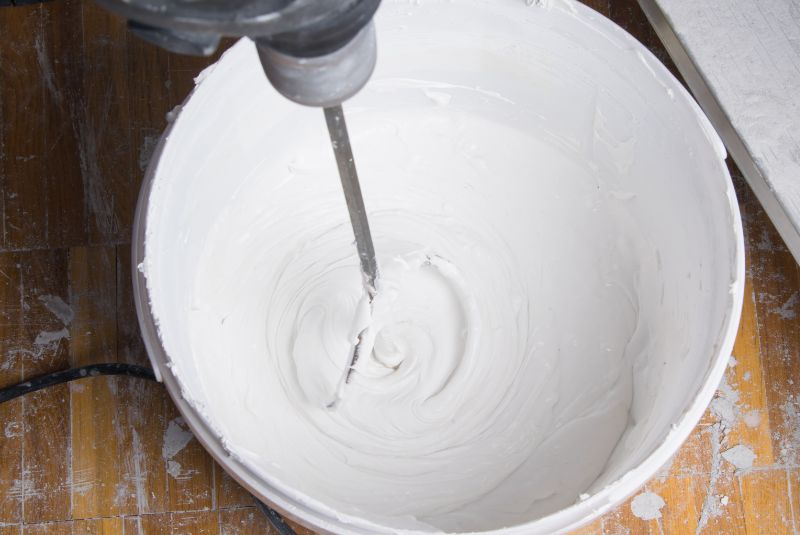
Step 4: Mix the Grout
Insert the paddle mixer vertically into the bucket and activate the drill, setting it to a low speed of less than 300 RPM.
Mix the grout for approximately one minute.
Ensure that you gently maneuver the mixing paddle around the sides of the bucket, guiding it back to the center.
Continue mixing until all dry grout clumps have seamlessly integrated.
Pro Tip Exercise restraint when mixing the grout; overly vigorous mixing can lead to the formation of air pockets within the grout, potentially compromising the strength of the tile bond.
Step 5: Let the Grout Slake
Allow the grout to rest, a process referred to as slaking, for a duration of 10 minutes.
During this interval, it’s essential not to disturb or stir the grout.
Step 6: Mix the Grout Again
Resuming the grout mixing process, operate the paddle mixer on low speed as it traverses through the slaked grout for a few seconds.
Step 7: Test Grout Consistency
Retrieve a portion of grout from the bucket using the margin trowel.
The grout should exhibit a smooth peanut butter-like consistency.
When the trowel is turned on its side, the grout should adhere to it without dripping off immediately, eventually releasing in larger chunks.
Step 8: Adjust Grout Consistency
If necessary, fine-tune the grout consistency by either adding dry grout or incorporating water.
For overly watery grout, introduce dry grout powder using the margin trowel and incorporate it into the mix.
Conversely, for excessively stiff or dry grout, introduce a small quantity of water.
After each addition, blend thoroughly using the electric drill and paddle mixer.
Helpful Tips for Mixing Tile Grout
- Optimal grout mixing occurs in environments with room temperatures exceeding 50°F (10°C), ensuring better grout flow and consistency.
- Consider incorporating latex additives to enhance grout curing, increasing its hardness and resistance to moisture penetration.
- Customize your grout’s color by adding powdered color additives to achieve your desired hue.
- When dealing with hard water, use softened or distilled water for grout mixing, as hard water can result in the formation of a white residue.
FAQs
What’s the best liquid to mix grout with?
When mixing grout, it’s advisable to avoid using hard or well water, as it may lead to grout exhibiting a white residue.
If possible, opt for distilled water as a superior alternative.
How long should you let grout sit before wiping?
For tile floors and other surfaces, it’s recommended to allow grout to sit undisturbed for a minimum of 15 to 30 minutes before proceeding with the wiping process.