Introduction
Laying tile on a plywood subfloor is indeed possible, but it requires careful planning and execution to ensure the tile’s integrity.
When done correctly, this process can provide a sturdy and beautiful tile surface.
In this guide, we’ll walk you through the essential steps for installing and using plywood as a substrate for ceramic, glass, stone, or porcelain tile.
Why Tile Must be Uncoupled from Plywood
When it comes to installing tile, having a solid and stable substrate is crucial.
Any movement or shifting of the base can lead to cracks and imperfections in the tile surface.
Unlike some other flooring materials like laminate or luxury vinyl tile, ceramic, porcelain, and glass tiles, along with their accompanying thinset and grout, are incredibly delicate and can’t withstand substrate movement.
Plywood, while generally dimensionally stable, is not stable enough for tile installations.
Even concrete, commonly considered a suitable base for tile, requires an uncoupling material to prevent tile damage.
This is where the concept of “uncoupling” comes into play.
Uncoupling Membrane for Tile and Plywood
One of the key solutions for this issue is using an uncoupling membrane, such as Schluter-Ditra.
These membranes, including popular brands like Schluter-Ditra, prevent the bond between the tile mortar and plywood from being too rigid, allowing each surface to move independently.
Additionally, uncoupling membranes serve as a barrier against moisture infiltration into surfaces below.
It’s worth noting that while uncoupling membranes add some height to the installation due to the additional layers of thinset and the membrane itself, they are generally more space-efficient compared to alternatives like cement board.
What You’ll Need
Equipment / Tools:
- Cordless drill
- Notched trowel
- Rubber float
- Sponges
- Bucket
Materials:
- Plywood sheets
- Modified thinset mortar
- Unmodified thinset mortar
- Plywood screws
- Uncoupling membrane
- Ceramic or porcelain tile
- Tile spacers
- Grout
- Grout haze remover
Instructions
Install an Intervening Sheet of Plywood
The first step in preparing your plywood subfloor for tile installation is to add an intervening sheet of thinner plywood on top of the existing subfloor.
Do not install the tile directly on the plywood subfloor itself.
Tip: Always use exterior-grade or marine-grade plywood for the substrate. Veneer-bond plywood should never be used.
Leave a Proper Gap Between the Boards
To accommodate the natural expansion and contraction of plywood, leave a 1/16-inch gap between the boards.
This small gap is essential to prevent the edges of adjacent plywood sheets from pressing against each other and potentially deforming when the plywood expands.
Screw the Plywood Down
Secure the top layer of plywood by screwing it down every 8 inches along the edges and every 6 inches in the field (interior section).
Ensure that all screw heads are flush with the level of the plywood.
If you notice any flexing in the plywood, add more screws to reinforce it.
If additional support is needed, consider strengthening the floor joists from below by sistering them with 2x10s or 2x8s.
Tip: Avoid aligning the joints of the top layer with those of the bottom layer to prevent two joints from stacking on top of each other.
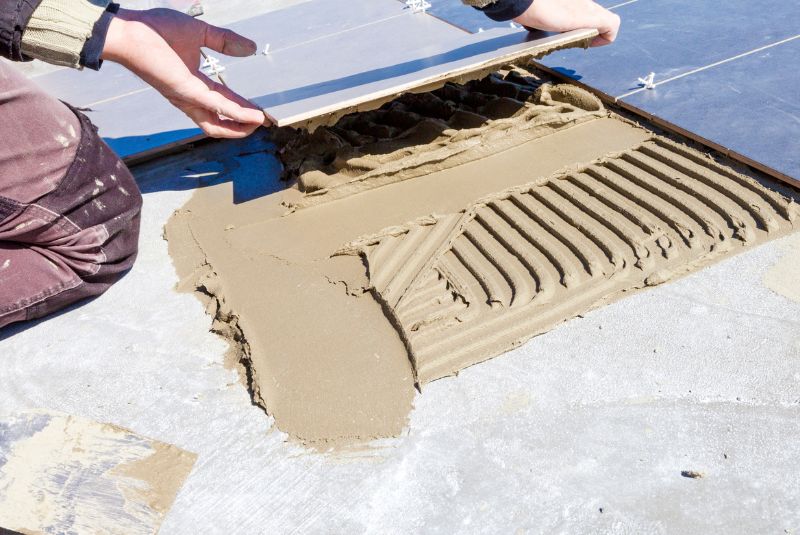
Trowel On the Modified Thinset
Use a notched trowel to apply a layer of modified thinset mortar to the plywood.
It’s essential to use modified thinset for this initial layer.
Lay Down the Membrane
While the thinset is still wet, press the uncoupling membrane onto the plywood.
Be diligent about not letting the thinset dry as you work quickly to ensure proper adhesion.
Trowel on the Unmodified Thinset
Switch to unmodified thinset mortar and apply it to the top surface of the uncoupling membrane using the notched trowel.
Install the Tile
With the unmodified thinset in place, begin installing the tile on top of the uncoupling membrane.
Use plastic tile spacers to maintain consistent spacing between the tiles.
Apply the Grout
After placing the tiles, use a rubber float to apply the grout across the tile surface.
Work the grout into the seams by pulling it diagonally over the tiles.
Be cautious not to dig into the grout lines between the tiles.
Remove the Grout Haze
Prepare a mixture of grout haze remover and use a sponge to apply it to the tile surface.
This will effectively remove any grout haze from the tiles.
Tips for Installing Tile on Plywood
Use High-latex Thinset: Ensure that you use a thinset with a higher latex content for bonding to plywood.
A quality unmodified thinset mixed with a latex additive is ideal.
Test the Plywood for Flex: After laying the plywood, perform a simple test to check for deflection.
Place a dinner plate on the plywood and a cereal bowl on the plate.
Fill the bowl to the rim with water and walk around the plywood near the bowl.
You should observe some ripples from vibration, but the water should not spill onto the plate.
Sink the Screws Properly: When screwing down the top layer of plywood, ensure that you don’t drive the screws deeper than the bottom layer of plywood.
Over-tightening the screws can negate the benefits of double layering and transmit movement from the joists directly to the top layer of plywood.
Cement Board as a Plywood Alternative: If you prefer an alternative to an uncoupling membrane, consider installing tile on top of a cement backerboard like Durock, Wonderboard, or HardieBacker.
Cement backerboard is moisture-resistant and provides an ideal bonding surface for thinset, making it an excellent choice for tile installations.
In conclusion, laying tile on a plywood subfloor is a feasible project when done correctly.
The use of uncoupling membranes ensures that the tile remains stable and free from cracks caused by substrate movement.
By following the detailed steps and tips provided in this guide, you can achieve a successful tile installation on your plywood subfloor, resulting in a beautiful and long-lasting floor.